Online help | DNC Precision
About software
DNC Precision is a communications program specially developed to exchange data and programs between a computer and any Numerical Control (NC) machine. The program makes it possible to send and receive programs written in the machine language. DNC Precision can run on any computer compatible with Windows 2000 and higher, including servers.
This program can send and receive files both in the manual mode (under the control of the PC user) and automatically by receiving certain requests from the NC.
Main program features:
| 1. | Working with several machines at a time if the system is built according to the radial scheme where each machine is connected to a separate serial port. |
| 2. | Creating separate configurations for several machines: |
| 1. | Configuring port parameters. |
| 2. | Using software or hardware handshaking. |
| 3. | Configuring the format of files that are sent and received. |
| 4. | Restricting users' access to the program settings. |
| 5. | Choosing a separate folder with programs for each machine. |
| 3. | Creating back-ups. |
| 4. | Working in the automatic mode when files are sent and received automatically. |
5. Processing commands transmitted in the header of a data block (only for machines supporting this feature).
Before you go on reading this guide, make sure you are well acquainted with the basic conceptions of the Windows operating system, such as:
•Launching programs.
•Managing windows.
•Managing files (saving, deleting, opening, etc.).
•Using folders and directories.
Company home page: https://www.aggsoft.com/
Software home page: https://www.aggsoft.com/dnc-precision.htm
Serial port hardware reference: https://www.aggsoft.com/rs232-pinout-cable/
Glossary
Baud Rate - The transmission speed of data through an asynchronous channel. Often confused with BPS (bits per second), baud rate actually refers to the number of signals per second. Because each signal can represent more than one bit of data, the number of bits per second is usually higher than the baud rate. For example, 2400 bps is typically sent at a rate of 600 baud.
Binary File - A file that contains data or program instructions written in ASCII and extended ASCII characters.
ASCII - An acronym for American Standard Code for Information Interchange. ASCII files are plain, unformatted text files that are understood by virtually any computer. Windows Notepad and virtually any word processor can read and create ASCII files. ASCII files usually have the extension .TXT (e.g., README.TXT).
Bytes - A collection of eight bits that represent a character, letter, or punctuation mark.
COM port - it is a short name for a serial communication port. Most DNC software communicate with a computer through a communication port, and most IBM and IBM-compatible computers support up to four serial ports COM1, COM2, COM3 and COM4. Additional ports can be added by adding additional hardware.
CNC - Computerized Numerical Control Refers to machine tools that have a computer and memory to control their operation. Most all non-manual machine tools sold today will be CNC. see also NC.
Data bits - A group of bits (1's and 0's) that represent a single character or byte. Typically, there are seven or eight data bits. During an asynchronous communication (e.g., BitCom connecting to CompuServe), each side must agree on the number of data bits. Data bits are preceded by a start bit and followed by an optional parity bit and one or more stop bits.
DNC - Acronym that can mean Distributed Numerical Control or Direct Numerical Control, depending upon the application. In the beginning DNC stood for Direct Numerical Control. A computer provided machine instructions for a NC milling machine that were transmitted over telephone lines. Later, the term DNC evolved to mean a system where a group of CNC machines are linked to a central computer. Or conversely, a combination of computers that are each linked to one or more CNC machines and the computers are linked together by way of a local area network. Distributed Numerical Control, whereby NC programs are sent (distributed) to the memory of a CNC machine. The program is then run from the CNC memory.
Flow control - A method of controlling the amount of data that two devices exchange. In data communications, flow control prevents one modem from "flooding" the other with data. If data comes in faster than it can be processed, the receiving side stores the data in a buffer. When the buffer is nearly full, the receiving side signals the sending side to stop until the buffer has space again. Between hardware (such as your modem and your computer), hardware flow control is used; between modems, software flow control is used.
Handshaking - Is the way in which the data flow between computers/hardware is regulated and controlled. Two distinct kinds of handshaking are described: Software Handshaking and Hardware Handshaking. An important distinction between the kinds are control signal types.
NC - Numerical Control The operation of a machine by a series of coded instruction's that consist of numbers and letters of the alphabet and other symbols. These are translated into pulses of electric current or other output signals that active motors and other device to run the machine. On early NC machines, these signals were often delivered to the machines by using punched tape. Moreover, the term NC machine refers to machine tools that do not have a computer and memory installed. see also CNC.
NC File - a file containing one or more programs in the special language for Numeric Control machines.
NC Program - a set of instructions written in the machine language and saved to an NC file.
Parity - In data communications, parity is a simple procedure of checking the integrity of transmitted data. The most common type of parity is Even, in which the number of 1's in a byte of data adds up to an even number, and None, in which a parity bit is not added.
PC - abbreviation for a Personal Computer.
Punch - CNC output device - used in CNC machines to output programs to perforated tape. Units can be parallel to tape punch or serial output.
RS232, RS423, RS422 AND RS485 - The Electronics Industry Association (EIA) has produced standards for RS232, RS423, RS422, and RS485 that deal with data communications. EIA standards were previously marked with the prefix "RS" to indicate the recommended standard. Presently, the standards are now generally indicated as "EIA" standards to identify the standards organization.
Electronic data communications will generally fall into two broad categories: single-ended and differential. RS232 (single-ended) was introduced in 1962. RS232 has remained widely used, especially with CNC control builders. The specification allows for data transmission from one transmitter to one receiver at relatively slow data rates (up to 20K bits/second) and short distances (up to 50' @ the maximum data rate). This 50' limitation can usually be exceeded to distances of 200' or more by using low capacitance cable and keeping the data rates down to 9600 baud and lower.
RTS/CTS Hardware handshaking - uses additional wires to tell a sending device when to stop or start sending data. DTR and RTS refer to these Hardware handshaking lines. you can select whether you need to use DTR or RTS individually, or use both lines for hardware handshaking. See also XOn/XOff.
Stop bits - In data communication, one or two bits used to mark the end of a byte (or character). At least one stop bit is always sent.
Upload - To send one or more files from your computer's disk storage to a remote computer. In DNC, this typically means from the CNC machine's control back to the DNC computer. This can also mean from your computer's disk to a remote computer, such as another PC or an online service or the internet.
System requirements
Windows 2000 Professional - Windows 10 (2019), including x64 and x86 OS, Workstation, and Server OS.
Installation process
If any beta-version was installed on your computer, remove it.
Quit of the working DNC Precision on installation time.
Run an installation file.
By default, the installation wizard installs DNC Precision in the "C:\Programs Files\DNC Precision" or "C:\Programs Files (x86)\DNC Precision" directory of your system disk, but you can change this path.
In the standard distributive of DNC Precision are no additional modules files, which you can download from our site.
Introduction
Once the program is launched, the main program window is opened (fig. 1). It is in this window that you create the list of active machines, select actions that should be done, view the log of either messages from the program itself or operations performed with a machine.
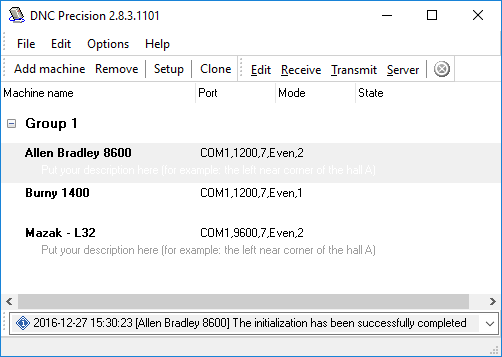
Fig. 1. The main program window.
The main program window contains:
| 1. | The toolbar with the buttons to perform quick actions, add, edit or remove machine descriptions and also to select the mode, the machine should work in. |
The toolbar contains the following buttons:
| 1. | Add - allows you to add a new machine to the list. Once the button is pressed, first you are prompted to enter the machine name, then the window for changing the default machine settings is opened. If you press "OK" in that window, the machine descriptions will be added to the list. Otherwise, the operation will be cancelled; |
| 2. | Remove - allows you to remove a machine description from the list. After you remove a description, no operations will be possible for the machine. To do the removing, select the necessary machine from the list and press the "Remove" button; |
| 3. | Setup - allows you to change the configuration of a previously added machine. To perform this action, you should select the necessary machine and press the button. A dialog window will appear where you can edit the needed parameters. After you press the "OK" button, the changes you have made will be saved. |
| 4. | Receive - allows you to receive a file from a machine in the manual mode. In this mode, the name of the file to be saved is asked and after it is specified, the program switches to the mode for receiving files. |
| 5. | Transmit - allows you to send a file from the computer to the machine in the manual mode. In this mode the name of the file to be sent is asked, and after it is specified, the program switches to the mode for sending files. |
| 6. | Server - switches the program to the server mode for the selected machine. In this mode, files are sent and received automatically without any activity from the user. For the program to work correctly in this mode, you should correctly configure the parameters related to the server mode. |
| 2. | The list of machines available for operations. The user creates the list thanks to buttons on the toolbar. |
| 3. | The combo box where all messages either from the program or from the selected machine are displayed |
| 4. | The status bar, where you can see the status of the program |
Warning: it is possible for monitors with low resolution not to display the entire window.
Note: It is the default that the access to the machine parameter settings is granted only after the password is entered. The default password is empty (you can change configuration without password).
Port parameters
To configure port parameters, go to the "Port - Port parameters" tab in the options window (fig. 2).
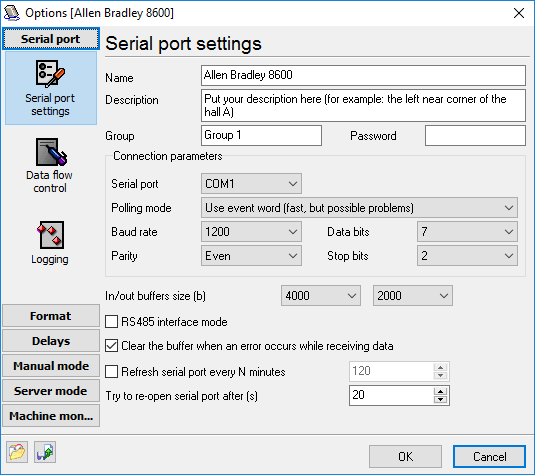
Fig. 2. Configuring port and general parameters.
Main parameter settings
Serial port - the serial port number via which the PC and the NC are connected.
Polling mode - there are two query modes:
•Event - when the program waits for a signal from Windows that the communications driver has received data and only after that it requests the size of the received data;
•Polling - when the program is constantly querying the communication driver if there are any data inside the internal buffer.
In the first mode, the computer resources are saved, but some slow computers can "skip" events and therefore lose data. That is why by default this mode is recommended for fast computers by default. Though, if you notice any problems in data transmission, we recommend that you choose the second mode.
The second mode uses relatively more computer resources, but this mode is more stable.
Baud rate - data transmission rate, bits per second. This rate should match that specified on the machine.
Stop bits - the number of bits added after each transmitted character and indicating the end of the character transmission. The amount of stop bits should match the one selected on the NC.
Data bits - the number of bits in each character. The amount of stop bits should match the one selected on the NC.
Parity - parity is a mechanism used to track errors while transmitting data. The parity settings should match the settings on the NC:
• None: no error tracking is done.
• Even: One additional bit is sent after each character.
• Odd: One additional bit is sent after each character.
• Mark: the evenness bit is always '1'. Errors cannot be tracked if this type of evenness is selected.
• Space: the evenness bit is always '0'. Errors cannot be tracked if this type of evenness is selected.
RS-485 interface mode - sometimes the communication line between the computer and the NC can be very long, in that case the RS-485 connection standard using a twin-core cable line can be used. In this mode, the program will not send data while they are being received, which it is possible according to RS-232.
Clear the buffer when an error occurs while receiving data - when you are just configuring a machine, you may need to see all the data (even if they contain errors) that arrive at the serial port. If it is the case, you should turn this option off. You do not have to do it in the usual working mode. That is why this option is off by default.
Data flow control (Handshaking)
To configure port parameters, you should switch to the "Port - Data flow control" tab in the options window (fig. 3).
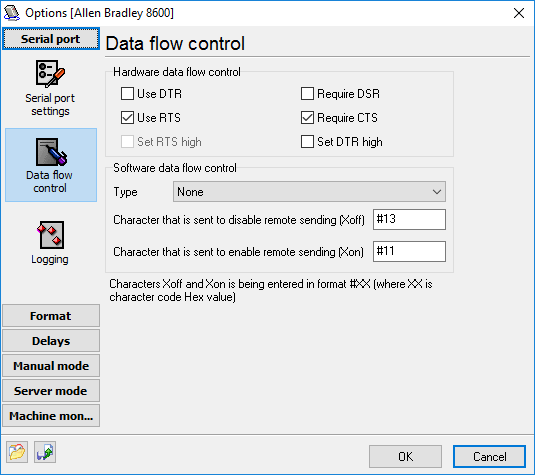
Fig. 3 Handshaking setup.
Handshaking is used when the NC cannot quickly process the received data. To prevent the input buffer in the NC from being overrun, it tells the program (DNC server) to pause sending data.
The method of exchanging signals between the NC and the DNC server is called handshaking. There are two handshaking methods: software (XOn/XOff) and hardware. For hardware handshaking, you will need a special cable with hardware flow control wires.
Software flow control (XOn/XOff) - Two bytes that are not usually used to transmit text are assigned to two special characters of pausing (XOff) and resuming (XOn) data transmission. When the NC wants the DNC Precision to pause sending data, it sends the character XOff (Transmission Off). When the buffer of the NC is empty, it sends the signal XOn (Transmission On), meaning that it is ready to receive data again. The default for XOff is ASCII 19, sometimes also called DC3 (Device Control 3), and ASCII 17 (DC1) for XOn. XOn/XOff are used only for text transmission. They cannot be used to transmit binary data, for binary files may contain the characters XOn or XOff.
Hardware flow control (RTS/CTS) - RTS/CTS is a normal form of hardware handshaking. The computer signals via the RTS (Request To Send) line that it wants to send data to the NC, while the NC sends the CTS (Clear To Send) signal when it is ready to receive data.
Hardware flow control (DTR/DSR) - The DTR (Data Terminal Ready) and DSR (Data Set Ready) signals can also be used for handshaking. The DNC server sends the DTR signal when it is ready to send and receive data, while the NC uses the DSR signal for that.
It is possible to use both handshaking methods simultaneously. The handshaking settings should match those on the NC.
XOn/XOff characters - Some machines use nonstandard characters for XOn/XOff. In this case, you can specify your code value for these characters. The character code is specified in the hexadecimal form #XX, where XX is the hexadecimal ASCII character code and can be calculated in the standard Windows calculator. If you are not confident, specify the default values of XOn = #11, and XOff = #13.
Set RTS high - If the RTS signal is not used for hardware handshaking, it can have either low or high level. The default "on" setting is high level.
Set DTR high - If the DTR signal is not used for hardware handshaking, it can have either low or high level. The default "on" setting is high level.
Logging
Logs will help you track and diagnose errors that may occur in the process of configuring and using the program.
To configure the log settings, you should switch to the "Port - Log files" tab in the options window (fig. 4).
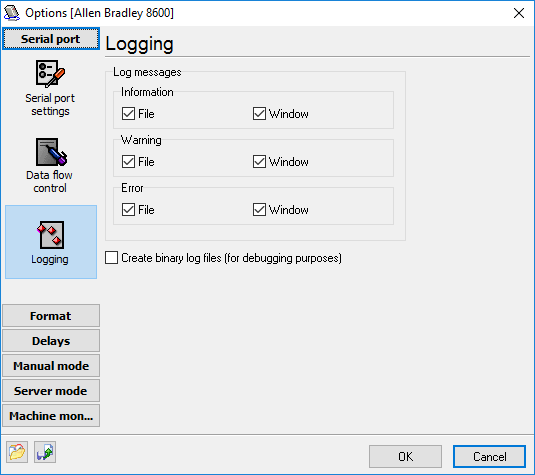
Fig. 4. Log settings.
The program has two types of log files:
Received data log files - these types of files are used to determine the configuration parameters of the machine when the connection is being established. This file allows you to find out the file format used for transmission and configure the DNCP according to it.
Message log files - when the program is working, there may appear both simple informational and error or warning messages. You can configure the level of details in message logs for each machine. The log file either can never be changed or it can be created each day/hour/month, which makes it easier to search for certain information in a log file by date.
For each log file type, you can specify a folder, where all files will store.
Program format
Each machine (NC) can have an individual NC program format. The format of programs can be either common (i.e., its parameters can be applied for programs that are both sent and received) or different for programs that are sent and received.
General settings
To change general settings, you should open the "Format - General" window (fig. 5)
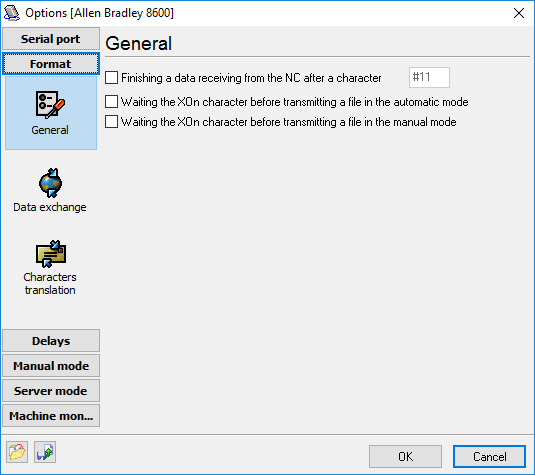
Fig. 5. General settings.
Finish receiving data from the NC after character - if you check this option and specify a hexadecimal character code, the DNC Precision will stop receiving data immediately after it receives this character.
Comment delimiters - these characters separate comments in the program body. In the server mode, comments contain requests to the DNCP from the NC, while the DNCP in its turn sends additional information to the NC (such as catalog contents, operation progress status, etc.). It is important to specify those characters correctly, as the correct interpretation of requests and responses depends on this.
Waiting XOn character before transmitting a file - this option allows the DNC server to transmit data to a NC machine only after XOn character receiving, that specified on the "Port" tab, and only if you do not use software flow control. This option is useful in some cases, when the DNC server can't detect with hardware flow control, that machine is now in the receiving state.
To change these settings, you should open the "Format - Data exchange" window (fig. 6).
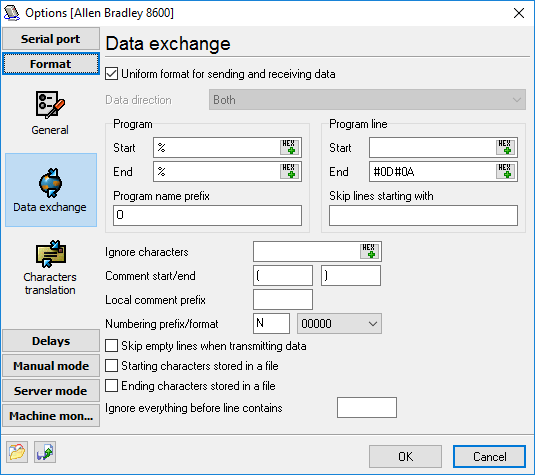
Fig. 6. Data transmission settings.
You can configure the data transmission format separately for each direction (sending and receiving). The direction of data transmission is selected from the drop-down list at the top of the dialog window. If the format is the same for both received and sent data, you can select the "Same format for receiving and sending" item from the list.
After you select the direction of data transmission, you should first configure the general format of the program. It is characterized by two parameters:
Start - the parameter indicating the beginning of the program. This parameter is a character string that can contain both usual ASCII characters ranging from 32 to 127 or any other character with the code specified in the form of #XX, where XX is the hexadecimal code of the needed character. All the data received before this byte sequence are considered a control header and processed correspondingly. For instance, if you enter the sequence of characters %#0A, the parameter of the program start will be two ASCII characters % and LF.
End - the parameter indicating the ending of the program. All the data received after this parameter are ignored by DNC Precision and are saved only to the received data log file. The format of this parameter is the same as of the previous one. If the "End" parameter is empty, DNCP stops receiving data after the specified timeout after the last received byte or character (Delays - File end sign timeout).
Program name prefix - it is by this parameter that the DNC Precision attempts to determine the size of the program file while receiving data.
After you configure the program format, you should configure the format of each program line. This format is also characterized by two parameters:
Start - the parameter telling the DNCP that the NC is starting to send a new program line. The parameter is entered in the same format as the previous parameters. If this parameter is not specified, the program starts receiving data from any character. In this case, a line is separated only by the line end parameters.
End - the parameter telling the DNCP that the NC is finishing to send a program line. The parameter is entered in the same format as the previous parameters. If this parameter is not specified, it will not be possible to separate lines in the general data flow. That is why this parameter is obligatory.
Skip lines starting with - this parameter defines such lines separated by the above-mentioned parameters that are not to be received or sent. If a line has this sequence of characters at the beginning, it will be skipped.
Ignore characters - one or several characters are specified in this input field. When a line separated by the above-mentioned parameters has one of the specified characters, they will be removed from the line.
Skip empty lines when transmitting data - if this option is on and if an empty line (containing only the line start and end parameters) is encountered while transmitting data, it will be skipped.
Characters translation
When you send and receive data, character replacement allows you to get rid of those characters that are unnecessary or unwanted for the DNC server, unacceptable for sending to a machine or incompatible with it. Character replacement is configured separately for each direction of data transmission. (fig. 7)
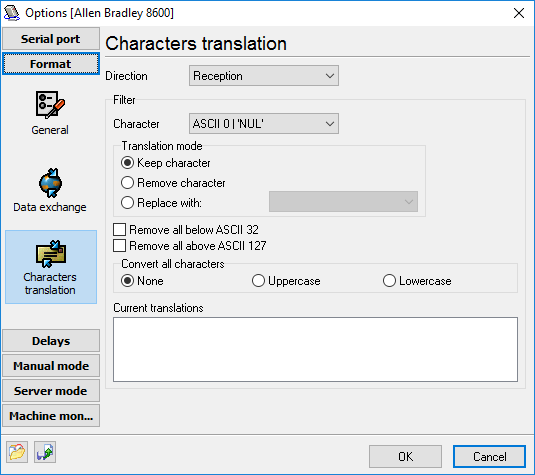
Fig. 7. Configuring character replacement.
Use the "Direction" field to specify the direction to be configured. Once it is specified, you will see what character replacement rules that are already set for this direction in the "Current translations" field. To define a rule, you should select the character code in the "Character" field and select the rule after that.
•Keep character - the selected character will not be changed. This action is default for all characters;
•Remove character - the selected character will be removed;
•Replace with - the selected character will be replaced with the one specified.
The following additional options are available:
Removing all below ASCII 32 - all characters with a code less than 32 will be removed. It means all unprintable characters.
Removing all above ASCII 127 - all characters with a code greater than 127 will be removed. It means all characters with the code requiring 8 bits of data.
Delays
Some machines need time to process the received data. To save the time for analyzing handshaking signals, you can specify preset delays that will ensure high-quality and robust data transmission.
To change time delays, you should open the "Delays" window (fig. 8)
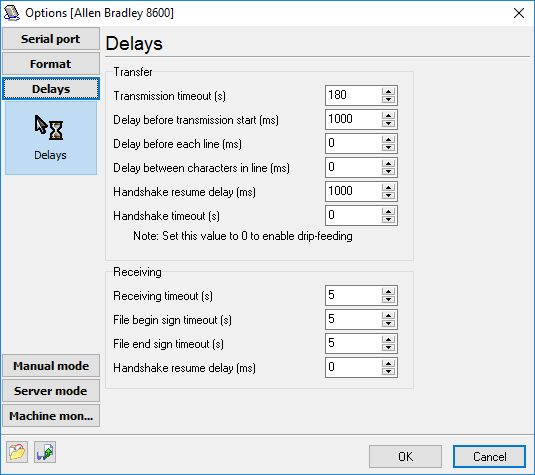
Fig. 8. Specifying delays.
Transfer
Transmission timeout (s) - Use this field to specify the time interval for the DNC Precision to return to the normal working mode.
Delay before transmission start (ms) - Use this field to specify the time for the DNC server to wait before sending data. This time interval will be observed either when a request is received from the NC in the server mode or between files in a cyclic mode of transmitting files.
Delay before each line (ms) - Use this field to specify the time interval to be observed before sending each program line.
Delay between characters in line (ms) - Use this field to specify the time interval to be observed between sending each character in a line.
Handshake resume delay (ms) - Use this field to specify the time interval to be observed between changes of RTS signal from up to down state.
Handshake timeout (s) (Drip feed mode) - our software supports drip feeding the large program to the machine control. In this mode, the DNCP sends a portion of data while the machine is receiving it. When the machine can't receive more (a machine memory is full) then the machine sends a signal to a PC (with help of the hardware flow control lines or the XOff character) and the PC waits unlimited time. When the machine is ready to receive a next portion of data, then the machine sends XOn or enable hardware flow control and the DNCP send a next portion of data.
Receiving
Receiving timeout (s) - Use this field to specify the time interval for DNCP to return to the normal working mode if no data received at all.
File begin sign timeout (s) - After this interval, DNCP will return to the normal working mode if no the program beginning sign (usually %) is received. This interval is being measured since any bytes is received from a CNC machine.
File end sign timeout (s) - After this interval, DNCP returns to the normal working mode and discards all received data if the program ending sign (usually %) is not received. This interval is being measured since the program begin sign is received.
Handshake resume delay (ms) - Use this field to specify the time interval to be observed between changes of RTS signal from up to down state.
Manual mode
Configuration
The manual mode is used to send and receive files under the control of the PC user. Depending on the granted permissions, the user can load files either from the specified folder or from any folder on the disk. The same is true for receiving files.
The behavior of the user and the program is determined by the settings specified on the "Manual mode - Directories and files" tab (fig. 9).
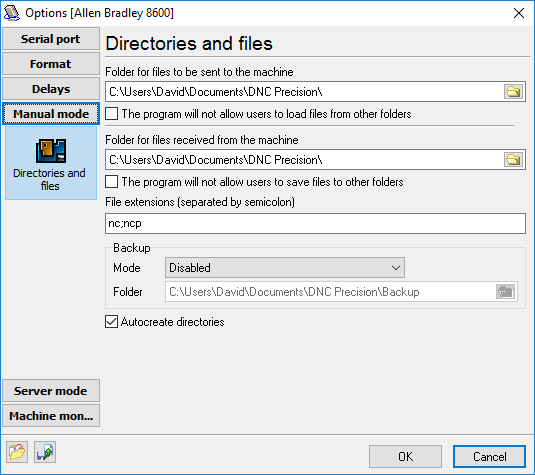
Fig. 9. Manual mode. Configuration.
Folder for files to be sent to the machine,
Folder for files received from the machine - these two folders define the location on the disk to be used by default for loading and unloading files. If you check the "Do not allow users to save/load files to/from other folders" option, the user will be able to choose files only from the folder specified in this field.
Do not allow users to save files to other folders,
Do not allow users to load files from other folders - this option restricts the user in choosing the location of files and prevents casual loss of information resulting from mistakes in his actions. If this option is on, files are always found in the specified location.
While transmitting files from the machine to the computer, sometimes it happens so that the transmitted file already exists on the disk in the specified folder. In this case, the program will follow the instructions specified in the "Backup" group.
Mode - defines what the program should do if it detects that the same file already exists on the disk:
•Disabled - no backup copies are created. The old file is replaced by the new one
•Copy old files to the backup folder - the file that already exists in the folder specified for saving will be moved to another folder (specified below)
•Rename the old file - the file existing in the folder will not be moved, but only renamed. An identification number 1, 2, 3 etc. will be added to its name.
•Rename the new file - the files existing in the folder will remain unchanged, while the new file will be renamed. Renaming is done as described above.
If mode #2 is selected, the "Folder" input field becomes available for editing. Here, you can specify the location on the disk where backup copies of files will be placed.
Auto-create directories - is this option is on, all the folders specified above will be created automatically. It means that you will not have to create them before launching the program. If the folder already exists, it will remain unchanged.
Transmitting files from the machine to the computer
You should do the following to transmit a file in this mode:
| 1. | Select a machine from the list in the main program window. |
| 2. | Press the "Receive" button. |
| 3. | Specify or choose the filename and the path. If the file exists, you will be asked with the "Replace the file?" dialog, where you can click "Yes" to confirm your action. |
| 4. | Click "OK". |
After this, the program will switch to the mode for receiving files. After that, you should quickly press the PUNCH button on the machine itself. If the machine was configured correctly, the message log will reflect the process of receiving the file. The final message will be that the file is successfully received. In any other case, an error message will be displayed.
If for any reason you decide to cancel receiving the file, press the "Stop" button on the toolbar in the main program window.
Transmitting files from the computer to the machine
You should do the following to transmit a file in this mode:
| 1. | Select a machine from the list in the main program window. |
| 2. | Press the "Send" button. |
| 3. | Specify or choose the filename and the path. |
| 4. | Click "OK". |
After this, the program will switch to the mode for sending files and will wait until the receiving device is ready. After that, you should press the READ button on the machine itself. If the machine was configured correctly, the message log will reflect the process of sending the file. The final message will be that the file is successfully sent. In any other case, an error message will be displayed.
If for any reason, you decide to cancel sending the file, press the "Stop" button on the toolbar in the main program window.
Settings
{Available only in the full Professional version}
It is the most "advanced" and intellectual working mode of the program. In this mode, all the program actions are performed automatically without the PC user actions. When the program is launched, it is automatically switched to the mode for receiving information from the machine. When receiving some data, the program analyzes their contents and depending on the processed information performs responds in one way or another:
•transmits a program file to the machine.
•receives a program file from the machine.
•transmits the information about files located in the specified or requested folder.
•deletes files in the specified folder.
•renames files located in the specified folder.
Folders for receiving and sending files are specified in the same way as in the previous section - "Manual mode".
Commands from the machine to the computer can be transmitted in two ways:
•As commands in the control header of the transmitted data block - the set of these commands is limited and directly depends on the machine manufacturer. Some machines may have no such commands. Often the control header is present in the machines with the feature of loading the programs from an external disk drive, working via the RS232 interface.
•As commands transmitted in the program body - is the most convenient way of transmitting the information between the machine and the PC. Nearly any information can be transmitted in this form. In this case, the data transmission format is determined by the message protocol, accepted on the DNC server. Using this way, the NC operator can request the information (folder contents, files) from the DNC server. The NC operator sends a small program to DNC Precision with the requests, to which he would like to receive responses.
The commands are extracted from the header according to the parameters specified in the "Server mode/NC commands format" tab (fig. 10)
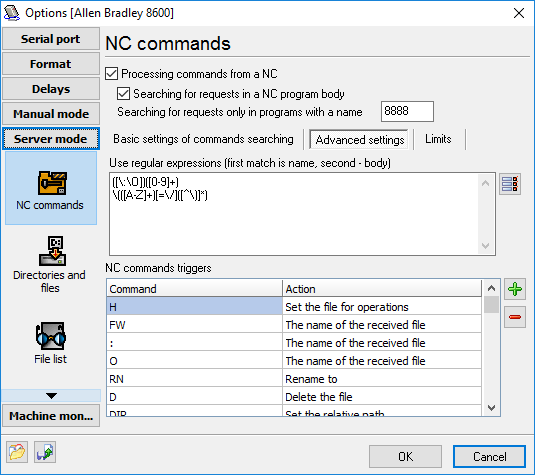
Fig. 10. NC command format.
If you are sure, that your machine uses service commands in the header (for example, you have found it out analyzing the log file), first it is necessary to enable this mode in the "Processing commands from NC" field. After that, it is necessary to specify the parameters by which the commands will be extracted from the general information flow.
Basic settings
Start - the parameter indicating the beginning of a command. This parameter is a character string, and it can contain usual ASCII characters ranging from 32 to 127 as well as any other character with the code specified as #XX, where XX is the hexadecimal code of the necessary character. All data received before this byte sequence are not considered as commands and are ignored. For example, if you enter the "#1B#26" character sequence, two ASCII characters - ESC (ASCII 27) and & - will be considered as the command start parameter.
End - the parameter indicating the end of a command. This parameter is a character string, and it can contain usual ASCII characters ranging from 32 to 127. The format of this value is identical to the previous parameter. All data received after this byte sequence are ignored.
The first N characters are the command name - after a command is separated from the program header or body using the parameters specified above, it is also necessary to identify its name and possible value. To achieve it, specify how many of the first characters are the name of the program. In addition to it, you can specify (only letters) that the name of the program can contain only letters. Thus, the maximum size of the command name is limited, but if the last characters are not letters, they will be cut off from the command name and added to the beginning of the command body.
Command name and name body are separated by - this field allows you to specify a separator between a command name (H,FW, etc.) and command body (file name, message etc.).
Advanced settings
These settings allow you to reveal all command extraction features, but require additional knowledge in regular expressions.
Use regular expressions - to separate commands from the service header or from the program body, we will use Perl-like regular expressions widely used to process text data. Having specified one or more regular expressions (each regular expression is specified on a separate line), you will define the corresponding number of rules for processing incoming data. When specifying a regular expression, you should have two matches as the result of its work. The DNC server will consider the first match to be the name of the command, while the second match will be considered the body of the command.
The DNC server can process commands transmitted in the program body. For a command to be correctly identified, the following conditions should be observed:
| 1. | All commands sent to DNCP must be transmitted in the NC program that has the name specified in the "Search for requests only in programs with a name" field (fig. 10). |
| 2. | The name of the NC program must be transmitted in the first line, and it must use the format specified in the "Program format" section. |
An example of the program for the NC operator to type:
O8888
N0010 (DIR=/VIPROS)
N0020 (PRG=0010)
%
The first line specifies the program name. In the DNC settings for the current machine, this name should match the one specified in the "Search for requests only in programs with a name" field because DNCP will search for requests from the NC only in programs with this name.
The second line contains the DIR =/VIPROS command that defines the folder for the operation of receiving a file or folder contents to be performed in.
The third line contains the PRG=0010 command, telling the DNC server to send the file named 0010 to the machine. To obtain the actual name of the file, the DNC server generates it from the prefix (it will be added before 0010), the suffix (will be added after 0010) and the extension (will be added at the end and separated from the suffix with a dot). After that, it will search for the file in the specified folder.
The last line with the % character indicates the end of the program, and it must match the one specified in "Program format".
After the NC operator sends a request, he should switch to the mode for receiving data from the DNC server within 3 minutes. If he does not do it, the DNC server will switch back to the mode for expecting requests from DNC. The request will result in either a file, or the disk contents, or the status of performing the operation.
If all the above-mentioned conditions are observed, the process will result in identifying one or several commands that the DNC server will be able to execute. Now it is necessary to match the identified command names with those supported by the DNC server. It is done in the "NC command triggers" list. The DNC server supports and can execute the following commands:
•Send a file - once the DNC server receives this command, it will queue the file the name of which was transmitted in the command body for sending. The final filename is generated from the prefix, the suffix and the extension specified on the "Folders and files" tab (fig. 11).
•File list - once the DNC server receives this command, it will queue the contents of the folder (or folders) specified on the "Directories and files" tab (fig. 11) in the "Folder for files to be sent to the machine" list for sending.
•Set the relative path - the name of the folder where the DNC server should search for programs to be sent to the machine. The folder name is defined relative to the folders specified on the "Directories and files" tab. For example, suppose C:\NC is specified in the DNC settings for the current machine and the body of the received command is VIPROS, in this case, the server will search for files in the C:\NC\VIPROS\ folder. If this command is not specified, the search for files is performed only in the folder specified in the DNC settings for the current machine.
•Skip - if you specify this action for a command, the command with this name will be skipped and there will be a record added to the message log informing that this command has been ignored.
•Set the file for operations - when this command is executed, the filename transmitted in the program body will be remembered and used for further operations (for example, renaming). If this command is the last one in the list of the processed commands, it will mean the request for sending the file with this name.
•The name of the received file - this command tells the DNC server that the command body is the name of the program that is being sent to the DNC server at the moment. Depending on this name, the server searches for commands in the program body because the name of the program to search for commands in is specified in the options (fig. 10). In case of non-service programs, this filename is used for saving the program file to the disk.
•Delete the file - the file the name of which is specified in the command body is deleted. The file is removed from the first found folder specified in the "Folder for files to be sent to the machine" list in the options.
•Rename to - the file the name of which was set earlier by the "Set the file for operations" command will be renamed to the file specified in the command body. Renaming is done in the first found folder specified in the "Folder for files to be sent to the machine" list in the options.
•Cancel current operation in the queue - this command instructs the DNC Precision to immediately cancel current command. This command is used if you want to cancel a current drip-feed operation and request a new file.
•Cancel all operations in the queue - this command instructs the DNC Precision to immediately cancel the current command and clear all commands in the queue. This command is used if you want to cancel a drip-feed operation and request a new file, but you queue some files to send before.
•Operator name - this command sets the operator's name. The operator's name is used in the machine monitor later. If you are using the machine monitor function, you can instruct your operators to use this command when the operator starts their job.
•Tool break - this command requests a file partially when a tool is broken, and you stopped your machine. The command is described in the following section.
•Tool break: add before, Tool break: add after - these commands are used in conjunction to the tool break command. These commands are described in the following section.
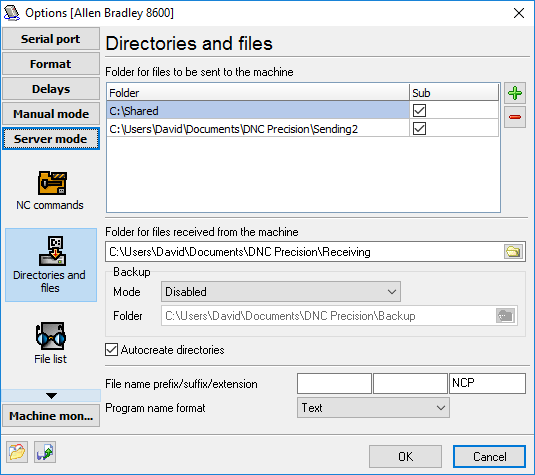
Fig. 11. Directories and files.
You may define multiple folders with subfolders to search a program requested. DNC Precision will send first found file that match your file name prefix, suffix and extension (see fig. 11). If your folders contain files with different extensions, you may define all your extensions in the "Extension" field. In this case, all extensions are semicolon delimited. For example, if your folders contain files like *.nc, *.ncp, *.iso, then you may define the extension string like "nc;ncp;iso" (w/o quotes). In this case, the program will use all these extensions for search.
File list
{Available only in the full Professional version}
In the server mode, the DNC server can process the request to send the list of files located in the folder specified in the "Folder for files to be sent to the machine" field on the "Server mode - Directories and files" tab.
After receiving the request to transmit the file list described in the "Commands in program body" section, the DNC server will generate the file list in a pseudo-program form with the format specified by the user on the "Server mode - File list" tab (fig. 12). Then the generated pseudo-program is ready to be sent to the machine. The NC Operator, in his/her turn, should switch the NC to the data receiving mode. Once it is done, the NC operator receives the program with the file list in its body.
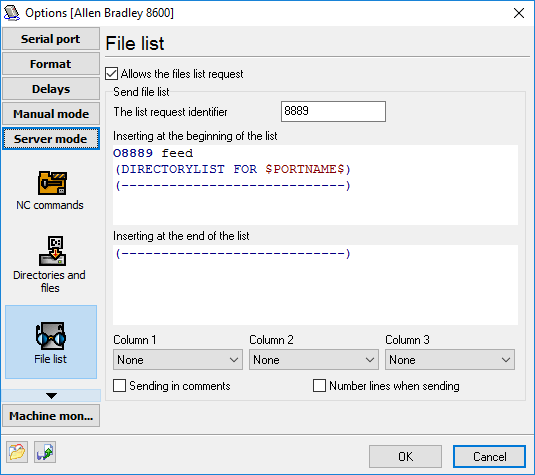
Fig. 12. File list format.
Example: If the operator sends:
O8889
N0010 (PRG=DIRLIST)
%
The DNC server will respond:
:8889 feed
N1000 ( DIRECTORYLIST FOR COM2 )
N1010 ( ----------------------------)
N1020 (1111 28.01.2004 12:23:30 121)
N1030 (8888 28.01.2004 13:07:00 23)
N9999 ( END OF LISTING )
M30
%
Allow file list request - this option allows the DNC server to process the requests to send the file list. If this option is off, the request to read the file list will be ignored, with the report generation option on, the NC operator will be sent an error message.
List request identifier - requests to send the file list can be transmitted not only in the request program body as it is described in the "Commands in the program body" section, but also as a separate, empty request program having its own name. This program name (specified in its first line) is the identifier. Having received the program with such an identifier, the DNC server generates the file list and sends it at once.
Insert at the beginning of the list, Insert at the end of the list - allows you to define your file list header and footer. The program will place the actual file list table between this text. Specifying these fields, you can use the $PORTNAME$ variables, describing the current DNC server status. The full description of the variables can be found in the "Variables" section.
Note: When sending the data from these fields, the program will try to determine the syntax of the entered data. It means that the line numbers and comment characters will NOT be added to the following lines:
•without the % character at the beginning;
•not beginning with the prefix set for the program name in the "Format" section;
•beginning with the sequence of the G50 kind, which is a standard G-code.
Column 1..3 - these combo boxes specify the format in which one line in the file list describing one file from the folder should be displayed. The following values are possible:
•No - do not display anything in this column;
•File name without extension - only the file name will be displayed in the column. Example: TESTFILE
•File name - the file name and its extension will be displayed in the column. Example: TESTFILE.NC
•Path - the file path will be displayed in the column. Example: C:\NCPROGRAMS
•Name and path - the file path and its full name will be displayed in the column. Example: C:\NCPROGRAMS\TESTFILE.NC
•File size - the file size in bytes will be displayed in the column. Example: 680
•File date - the file creation date will be displayed in the column. Example: 12/12/2004
•File time - the file creation time will be displayed in the column. Example: 12:12:04
•File date and time - the file creation date and time will be displayed in the column. Example: 12/12/2004 12:12:04
Send in comments - if this option is on, the file list will be included in the comment delimiters specified in the program format.
Number lines when sending - if this option is on, each line of the file list will be numbered. Line numbering will start at 1000 with the step of 10.
Note: If you enable the "Number lines when sending" and "Send in comments" options, but you want to transmit some lines unchanged (without numbers and comments), put the '!' character at the beginning of the line (see the example below).
Template text example:
!:8889 feed
DIRECTORYLIST FOR $PORTNAME$
----------------------------
or
END LISTING
!M30
Reports
{Available only in the full Professional version}
While transmitting and receiving files, processing requests in the automatic mode, it is sometimes necessary to inform the operator about the operation performance status. It can be done with the help of reports. The DNC server can generate the following types of reports:
•the file has been successfully received from the NC;
•the file has not been successfully received from the NC;
•the request has not been completed.
To edit report parameters, you should switch to the "Server mode - Reports" tab (fig. 13).
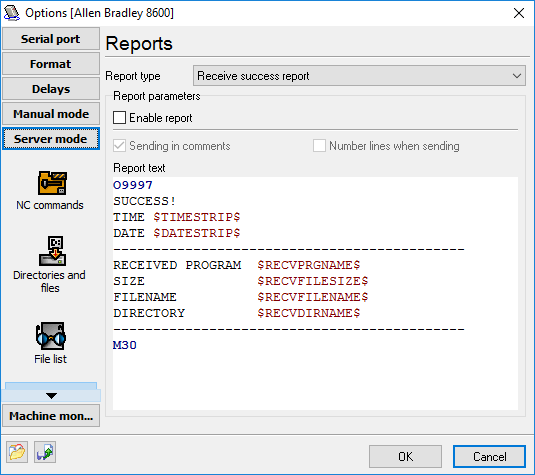
Fig. 13. Reports parameters editing.
Report type - selecting the report type which parameters you want to edit.
Enable report - if you enable this option, the current report will be generated and sent to the machine.
Send in comments - the lines of the report generated from the template will be included between the comments.
Number lines when sending - lines of the report generated from the template will be numbered starting at 1000 with the step of 10.
Report text - the report text template you want to send. You can use special variables in the report text that the program replaces with the corresponding value before sending to a machine.
Note: If you enable the "Number lines when sending" and "Send in comments" options, but you want to transmit some lines unchanged (without numbers and comments), put the '!' character at the beginning of the line (see the example below).
Template text example:
!:9997
SUCCESS!
TIME $TIMESTRIP$
DATE $DATESTRIP$
--------------------------------------------
RECEIVED PROGRAM $RECVPRGNAME$
SIZE $RECVFILESIZE$
FILENAME $RECVFILENAME$
DIRECTORY $RECVDIRNAME$
--------------------------------------------
!M30
Tool break command
{Available only in the full Enterprise version}
This is the command used to identify the file that you wish to download partially. This configuration page allows you to define the header, body, and trailer sections of the program. These sections will then be assembled into a temporary file and send to a machine so that you can re-execute the portion of the program that occurred after the tool break. The operator should send to DNC Precision a control program like:
%
O8888
(TOOLBREAK=N100)
(PRG=0010)
%
This program contains the following commands:
TOOLBREAK=N100 - specifies the tool break line in the program and contains two parts:
1. TOOLBREAK. It is the command name. This command name should be defined in the NC commands trigger list and assigned to the "Tool break" action. You may use any word instead of TOOLBREAK. In this case, you should make corresponding changes in the control program above and in the NC commands trigger list.
2.N100. It is the tool break line. You may define here:
•If your program contains numbering - program line number, like "N100";
•If your program doesn't contain numbering - any text that appears in the program, like "X0.001Z100". DNC Precision will search the first line with this text and use this line as a tool break line.
•You may specify any number, like "100". DNC Precision will use the line with this number as a tool break line.
PRG=0010 - specifies the program name to send. This command queues the program with this name to send. This file will be preprocessed to a temporary file before sending. DNC Precision will use header and footer sections and rules in these sections to assemble a temporary file.
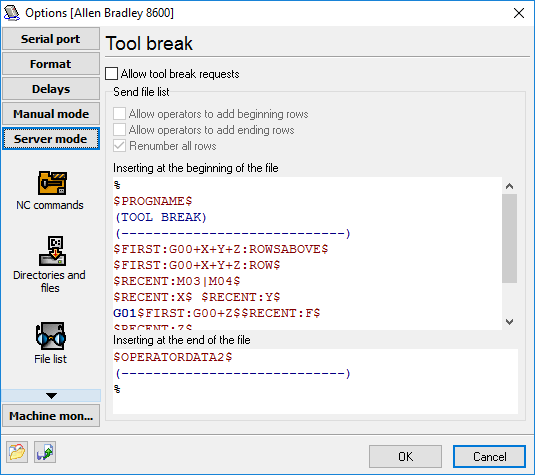
Fig. 14. Tool break command.
Tool break header (Inserting at the beginning of the file)
This optional field may contain any text and special variables (enclosed by $$) that will be added to a temporary file. Text lines will be added without modifications. All variables will be replaced with corresponding values.
Tool break variables
PROGNAME - the program name. DNC Precision searches the program body for first entry of the "Program name prefix" and use these characters as a program name.
FIRST - DNC Precision searches for first entry of specified text. Example: FIRST:G#0+X+Y+Z:ROWSABOVE. The variable contains three parts:
1.FIRST - variable name;
2.G#0+X+Y+Z - the search condition. You may define any text here (except $ character) or define a complex search condition. The complex search condition means that a target line should match all or one of the rules defined in this complex search condition. The complex search condition may contain "AND" or "OR" conditions. The "AND" condition example is "G01+X+Y+Z". This complex condition instructs DNC Precision to search a line that contains G01 and X and Y and Z strings. The "OR" condition example is "M03|M04". This complex condition instructs DNC Precision to search a line that contains any from M03 or M04. You may use both AND and OR conditions at the same time. The following example illustrates the "G01+X+Y|Z" condition. The AND condition has more priority than the OR condition. Therefore, DNC Precision will search a line that contains G01 and X and one of Y or Z. The search text may contain a special character #, like G#0. This character instructs DNC Precision to search any text that may contain one or more "0" (zero) at this position. Therefore, the G#0 condition may match G0, G00, G000, etc. M#3 condition may match M3, M03, M003, etc.
3.ROWSABOVE - optional, one or more variable parameters. These parameters are delimited by a comma.
RECENT - DNC Precision searches for most recent entry of specified text from the tool break line (except the tool break line). It means that DNC Precision search text backward, from the tool break line to the top of the file. Example: RECENT:X. The format of this variable is the same as the "FIRST" variable.
OPERATORDATA1, OPERATORDATA2 - this variable will be replaced with a text that an operator sends in the control program.
Variable parameters
Note: These parameters are applicable for FIRST and RECENT variables only.
ROWSABOVE - DNC Precision copies all lines above the found line to a temporary file;
ROW - DNC Precision copies the found line to a temporary file;
ROWS### - DNC Precision copies ### lines (where ### is any positive number) after the found line to a temporary file;
SEEK - DNC Precision uses this line as a temporary tool break line for next FIRST or RECENT variable;
CS - the search is sensitive to a character's case. If this parameter isn't defined, then the search is case-insensitive;
RE - the search string is a regular expression (advanced usage).
Options
Allow operator to add beginning rows - if this option is enabled, OPERATORDATA1 may be replaced with a text that operator may specify in the control program. Otherwise, this variable will be replaced with an empty line.
Allow operator to add ending rows - if this option is enabled, OPERATORDATA1 may be replaced with a text that operator may specify in the control program. Otherwise, this variable will be replaced with an empty line.
Renumber all rows - if this option is enabled, then DNC Precision will renumber all rows before sending the temporary file. Otherwise, you may define line numbers in the header and footer templates.
Real world example
The control program:
%
O8888
(PRG=100)
(TOOLBREAK=N000299) <-- Tool break line
%
The header template:
%
$PROGNAME$
(TOOL BREAK)
(----------------------------)
$FIRST:G#0+X+Y+Z:ROWSABOVE$
$FIRST:G#0+X+Y+Z:ROW$
$RECENT:M#3|M#4$
$RECENT:X$ $RECENT:Y$
G01$FIRST:G#0+Z$$RECENT:F$
$RECENT:Z$
$OPERATORDATA1$
The footer template:
$OPERATORDATA2$
(----------------------------)
%
The source program:
%
O0100
N000001 G90 G80 G00 G17 G40 G54
N000002 G43 H1 Z80. S3000 M03
N000003 G00 X94.11 Y0.0 Z60. M08
N000004 Z15.
N000005 G01 Z10.8 F840
N000006 X111.61 F2800
N000007 X174.11
N000008 Y-7.025
N000009 X196.941
N000010 G02 X226.615 Y-2.599 I25.5 J-69.276
N000011 G01 X238.56
N000012 Y2.599
N000013 X226.491
N000014 G02 X197.014 Y7.024 I-3.984 J73.849
N000015 G01 X174.11 Y7.023
N000016 Y0.0
N000017 X161.61
N000018 Y-19.525
N000019 X199.276
N000020 G02 X226.245 Y-15.099 I23.166 J-56.776
N000021 G01 X251.06
N000022 Y15.099
N000023 X226.139
N000024 G02 X199.343 Y19.524 I-3.631 J61.349
......
N000205 Z12.6
N000206 G01 Z8.4 F840
N000207 X111.61 F2800
N000208 X194.836
N000209 X174.11
N000210 Y-0.339
N000211 X215.562
N000212 X218.886 Y-0.105
N000213 X224.072 Y-0.133
N000214 X238.56
N000215 Y0.134
N000216 X224.401
N000217 X218.883 Y0.105
N000218 X215.562 Y0.339
N000219 X194.836
N000220 Y12.839
N000221 X161.61
N000222 Y-12.839
N000223 X216.002
N000224 X219.291 Y-12.607
N000225 X224.072 Y-12.633
N000226 X251.06
N000227 Y12.633
N000228 X224.335 Y12.634
N000229 X219.289 Y12.607
N000230 X216.002 Y12.839
N000231 X194.836
N000232 Y25.339
N000233 X149.11
N000234 Y-25.339
N000235 X216.442
N000236 X219.697 Y-25.11
N000237 X224.072 Y-25.133
N000238 X263.56
N000239 Y25.133
N000240 X224.27 Y25.134
N000241 X219.696 Y25.11
N000242 X216.442 Y25.339
N000243 X194.836
N000244 Y37.839
N000245 X136.61
N000246 Y-37.839
N000247 X216.881
N000248 X220.103 Y-37.612
N000249 X224.072 Y-37.633
N000250 X275.349
N000251 X276.06 Y-36.943
N000252 Y36.824
N000253 G02 X275.261 Y37.633 I29.106 J29.569
N000254 G01 X224.204 Y37.634
N000255 X220.103 Y37.612
N000256 X216.881 Y37.839
N000257 X194.836
N000258 Y50.339
N000259 X125.412
N000260 X124.11 Y49.841
N000261 Y-49.848
N000262 X125.399 Y-50.339
N000263 X217.321
N000264 X220.51 Y-50.114
N000265 X224.072 Y-50.133
N000266 X281.298
N000267 X281.83 Y-49.329
N000268 X284.328 Y-46.338
N000269 X286.495 Y-44.235
N000270 X288.56 Y-42.606
N000271 Y42.63
N000272 G02 X281.165 Y50.133 I16.606 J23.764
N000273 G01 X224.138
N000274 X220.51 Y50.114
N000275 X217.321 Y50.339
N000276 X194.836
N000277 X199.836 Y57.839
N000278 G03 X194.836 Y62.839 I-5. J0.0
N000279 G01 X123.082
N000280 X119.926 Y61.62
N000281 X117.146 Y60.612
N000282 X116.77 Y60.532
N000283 X112.002 Y60.27
N000284 X111.951 Y59.889
N000285 X111.673 Y56.807
N000286 X111.61 Y53.651
N000287 Y-53.651
N000288 X111.672 Y-56.807
N000289 X111.95 Y-59.888
N000290 X112.001 Y-60.261
N000291 X116.77 Y-60.566
N000292 X117.215 Y-60.667
N000293 X119.926 Y-61.627
N000294 X123.082 Y-62.839
N000295 X217.76
N000296 X220.916 Y-62.617
N000297 X224.072 Y-62.633
N000298 X288.016
N000299 X291.871 Y-56.807
N000300 X293.503 Y-54.852
N000301 X294.741 Y-53.651
N000302 X296.036 Y-52.629
N000303 X296.659 Y-52.25
N000304 X301.06 Y-50.783
N000305 Y50.792
..............
M30
%
The result program:
%
O0100 <--- PROGNAME variable
N00010 (TOOL BREAK) <--- copied by $FIRST:G#0+X+Y+Z:ROWSABOVE$
N00020 (----------------------------) <--- $FIRST:G#0+X+Y+Z:ROWSABOVE$
N00030 G90 G80 G00 G17 G40 G54 <--- $FIRST:G#0+X+Y+Z:ROWSABOVE$
N00040 G43 H1 Z80. S3000 M03 <--- $FIRST:G#0+X+Y+Z:ROWSABOVE$
N00050 G00 X94.11 Y0.0 Z60. M08 <--- $FIRST:G#0+X+Y+Z:ROW$
N00060 M03 <--- $RECENT:M#3|M#4$
N00070 X288.016 Y-62.633 <--- $RECENT:X$ $RECENT:Y$
N00080 G01Z60.F2800 <--- G01$FIRST:G#0+Z$$RECENT:F$
N00090 Z8.4 <--- $RECENT:Z$
N000299 X291.871 Y-56.807
N000300 X293.503 Y-54.852
N000301 X294.741 Y-53.651
N000302 X296.036 Y-52.629
N000303 X296.659 Y-52.25
N000304 X301.06 Y-50.783
N000305 Y50.792
..............
M30
%
Variables
Dates
$DATE$ - The date in the format set on the computer. Example: 29/04/04
$TIME$ - The time in the format set on the computer. Example: 13:12:02
$DATETIME$ - The date and time in the format set on the computer. Example: 29/04/04 13:12:02
$DATESTRIP$ - The date in the format set on the computer, but only digits. Example: 290404
$TIMESTRIP$ - The time in the format set on the computer, but only digits. Example: 131202
$DATETIMESTRIP$ - The date and time in the format set on the computer, but only digits. Example: 290404 131202
$DATECLEAN$ - The date in the format set on the computer, but only characters that can be used in a filename. Example: 29-04-04
$TIMECLEAN$ - The time in the format set on the computer, but only characters that can be used in a filename. Example: 13-12-02
$DATETIMECLEAN$ - The date and time in the format set on the computer, but only characters that can be used in a filename. Example: 29-04-04 13-12-02
$DATEA$ - the abbreviation for the current day of the week
$DATEAA$ - the full name of the current day of the week
$DATEB$ - the abbreviation for the current month
$DATEBB$ - the full name for the current month
$DATED$ - the number of the current day (01 - 31).
$DATEJ$ - the number of the current day in the year (001 - 366).
$DATEM$ - the number of the current month (01 - 12).
$DATEU$ - the number of the current week in the year, where Sunday is the first day of the week (00 - 53).
$DATEW$ - the number of the current day of the week, (0 - 6; Sunday = 0).
$DATEWW$ - the number of the current week in the year according to the ISO standard, where Monday is the first day of the week (00 - 53).
$DATEY$ - the current year, the last two digits as a number (00 - 99).
$DATEYY$ - the current year in full.
$TIMEH$ - The current hour in the 24-hour (ISO) format (00 - 23).
$TIMEI$ - The current hour in the 12-hour format (01 - 12).
$TIMEM$ - The current minute (00 - 59).
$TIMEP$ - the pm/am indicator for the 12-hour format
$TIMES$ - the current second (00 - 59).
Program name
$RECVONO$ - the number of the received program with a prefix. Example: O12
$RECVONO4$ - the 4-digit number of the received program with a prefix. Example: O0012
$RECVONO6$ - the 6-digit number of the received program with a prefix. Example: O000012
$RECVONO8$ - the 8-digit number of the received program with a prefix. Example: O00000012
Path
$ORGPATH$ - the filename sent or received last and its path. Example: C:\MILL\Mould.nc
$ORGNAME$ - the filename sent or received last. Example: Mould.nc
$ORGNAMENOEXT$ - the filename sent or received last time, without its extension. Example: Mould
$ORGEXT$ - the extension of the file name sent or received last time. Example: nc
$ORGDIR$ - the path of the file that was sent or received last time. Example: C:\MILL
Machine
$PORTNAME$ - the name of the serial port. Example: COM1
$MACHINENAME$ - the name of the machine in the configuration. Example: Generic CNC Machine
$MACHINEDESC$ - the description of the machine in the configuration. Example: Left-top cornet of the hall 1
$OPERATOR$ - the machine operator login received from the machine using the "Operator name" command.
Report variables
$RECVPRGNAME$ - the name (number) of the program received last. Example: 5643
$RECVFILESIZE$ - the size in bytes of the program file received last. Example: 604
$RECVFILENAME$ - the full name of the program file on the disk received last. Example: TEST.NC
$RECVDIRNAME$ - the name of the folder where the program file received last was saved. Example: C:\MILL\
$RECVPATH$ - the full name of the program file received last and its path. Example: C:\MILL\TEST.NC
$RECVERRTEXT$ - a brief description in the English language of the error that occurred while receiving the last file. Example: File not found.
$RECVBYTES$ - the amount of the received bytes
$RECVLINES$ - the amount of the received lines
$RECVERRORS$ - the amount or errors that occurred during the process of receiving
$RECVLPS$ - data receiving rate (lines per second)
$RECVCPS$ - data receiving rate (characters per second)
Settings
{Available only in the full enterprise version}
The Machine monitor function in DNC Precision utilizes the Fanuc Macro-B functions to passively monitor "Cycle start", "Cycle stop", "Tool change" and other events that your machine can generate. The following describes how to set it up.
If you have "User Macro B" in your Fanuc control, you can use the POPEN, DPRNT, and PCLOS statements. Not all Fanuc have this option, however, so we use another method as well. On any Fanuc control, if you go to EDIT mode and type: POPEN then press INSERT, the CNCs that have the option will display the word just like it's shown. If it puts spaces between each letter, like this:
P O P E N
then the CNC doesn't recognize the POPEN key word, and you don't have the option.
Insert a Macro Call Command at the beginning of the NC Program, right after the ‘O<number>’, and another Macro Call Command at the end, just before 'M30’. These quite simple macros utilize the DPRNT declaration to transmit a short character string from the serial port of the CNC. At the beginning of all NC programs, insert this Macro Call:
O9010 (CYCLE START MACRO)
POPEN
DPRNT[(***CYCLESTART***)]
PCLOS
M99
O9010 (CYCLE STOP MACRO)
POPEN
DPRNT[(***CYCLESTOP***)]
PCLOS
M99
If you use certain O-numbers for these macros, you can also assign a custom G-code or a custom M-code to automatically call them. In some cases, you won't even need to modify your programs at all. For example, if all your programs have a certain G-code at the beginning (say, "G20" for Inch programming), you can just put the number "20" in a parameter to make "G20" always call macro 9010. Similarly, you can have the control call the "CYCLESTOP" macro with the M30. The parameter locations for these settings are different in each model Fanuc control, so you will have to look them up in the manual.
On the DNC side, just keep the port open and listen for the word "CYCLESTART" or "CYCLESTOP" (followed by a Line-Feed) then record the event in a file with the Date and Time variables from the PCs internal clock. You can then go back later and analyze all these events and calculate how many cycles you have, average cycle time, average load time, etc. We even tie this into our automatic paging and e-mail software, so someone can get a page or e-mail if the machine has been idle for more than (x) minutes.
For machines that DON'T have User Macro B, you can try another method for cycle start/stop monitoring:
You can use a small relay and connect it to the signal that powers the "in cycle" light bulb or LED on the operator's panel. This relay then turns on one of the unused handshake lines on the RS232 cable (say, pin #8, or CD). Our DNC software just watches this signal, and knows the CNC is in cycle if it's on, and out of cycle when it's off. In this case, you can't use activity triggers and can use cycle start/stop monitoring only. You can enable this feature on the "Additional options" tab.
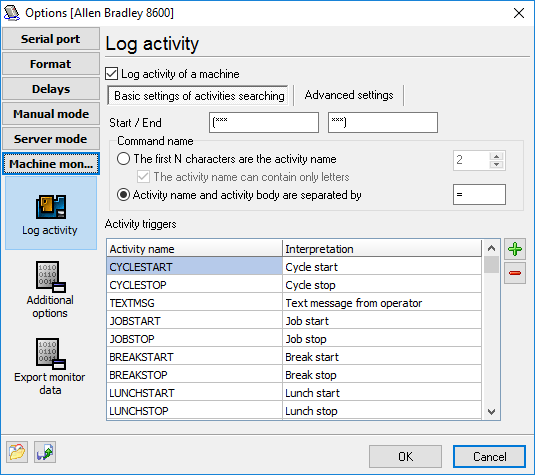
Fig. 15. NC activity triggers.
Basic and advanced settings are very similar with same settings of the server mode. Here, you can define rules, that our software will use to extract your activities. Please note that you should use another format of activities if you are using the server mode because your activity trigger names can interfere with NC commands in the server mode.
Default values are:
Activity start: (***
Activity end: ***)
So, your activity will be (***A=1234***) or a program with activity within:
O9010 (CYCLE STOP MACRO)
POPEN
DPRNT[(***A=1234***)]
PCLOS
M99
It is an example only, and you can define your own rules and activity triggers. You can use many built-in trigger names and their interpretations, or define a new one. For example, you can define a trigger with name "A" and interpretation "Smoking" and the program will export this text to a log file.
So, you defined activity triggers. If you didn't define a trigger name, then the trigger with this name will not be exported.
The list of activity triggers is not limited by cycle start/stop commands. You can define few macro or call DPRINT within your main program. Some examples are listed below:
When a spindle start command (M03 or M04) is executed, this macro is called:
O9xxxx
POPEN
DPRNT[TOOLCHANGE=#4120[40]]
PCLOS
M99
The DNC software will write this activity and tool number to a log file.
When a spindle stop command (M05) is executed, this macro is called:
O9xxxx
POPEN
DPRNT[TEXTMSG=Punch beginning]
PCLOS
M99
The DNC software will write your custom message to a log file.
Additional options
{Available only in the full enterprise version}
This page will be activated if you'll enable the "Log activity" box on the previous page.
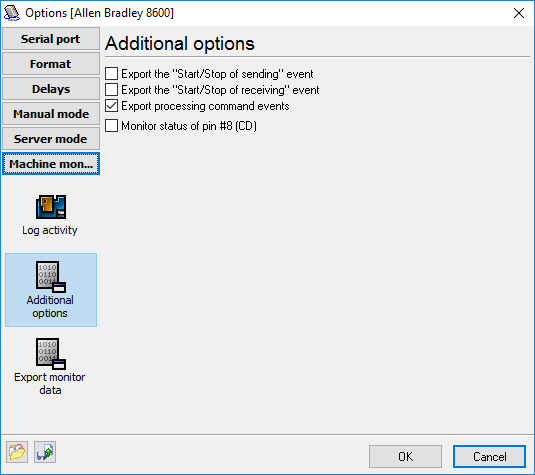
Fig. 16. Additional options.
Export "Start/Stop sending" event - the program will write a text message to a log file when the program starts and stops sending a program to a machine in the server mode. It can help you to track an operator activity.
Export "Start/Stop receiving" event - the program will write a text message to a log file when the program starts and stops receiving a program to a machine in the server mode. It can help you to track an operator activity.
Monitor status of pin #8 (CD) - You can use a small relay and connect it to the signal that powers the "in cycle" light bulb or LED on the operator's panel. This relay then turns on one of the unused handshake lines on the RS232 cable (say, pin #8, or CD). Our DNC software just watches this signal, and knows the CNC is in cycle if it's on, and out of cycle when it's off and writes a corresponding row to a log file.
•Debounce intervals - this interval can help you to remove non-significant events that can generate a relay. 0 - don't use a debounce interval.
•Invert CD signal - it depends on your relay connection schematic.
•Ignore CD signal while sending data - some machine turn "In cycle" signal off when receiving data over RS232 interface. In this case, this option can help you exclude non-significant events.
Export monitor data
{Available only in the full enterprise version}
This page will be activated if you'll enable the "Log activity" box on the "Settings" page.
Our software can export monitor data to many targets with help of data export plugins. All targets are listed in the "Export targets" list. You can download data export plugin for your needs from our site and install it. Most plugins are free for registered customers. Before exporting data, you should assign a data value to each column in a target document (Excel, database table, etc.). You can do it with help of the "Columns" table. Simply, select a data description from a drop-down list.
When you assigned columns, then you can activate a data target in the list and configure this target by clicking the "Setup" button. The plugin's setup options are described in the help file that is bundled with a corresponding plugin module, and you can open this file by clicking the "Help" button.
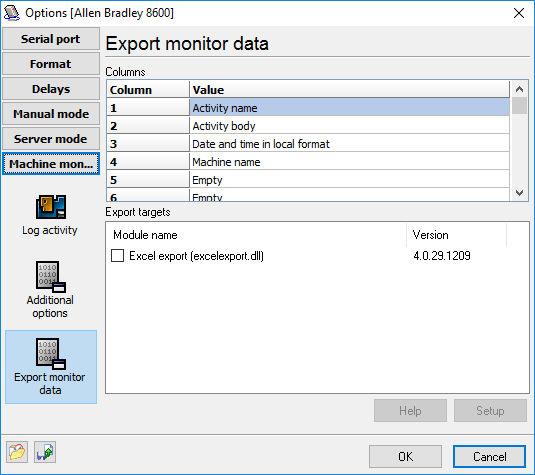
Fig. 17. Export monitor data.
Real-world example
This real-world example describes a machine that has a probe to measure components after they have been machined.
The machine has a 25 pin RS232 port which we have connected to a laptop using a 9 pin RS232, and have been able to receive data.
You will need DNC Precision with machine monitor function enabled. The input/output port setting on the SETTINGS page of OFFSETS key will need to be set to 0 (zero) to point output to the RS232.
Type and start the demo program below. Don’t forget POPEN and PCLOS top AND BOTTOM.
%
O1919(DPRINT TEST)
#4=4444.
#5=5555.
#18=18.18
#1=111.1
#25=25.25
#28=28.28
#29=29.29
#137=137.137
#138=138.138
#139=139.139
#143=143.143
POPEN
DPRNT[(***COMPONENT=#121[60]***)]
DPRNT[(***FEATURE=#122[40]***)]
DPRNT[(***PCDFEATURE=#147[30]***)]
DPRNT[(***INCX=#4[44]***)]
DPRNT[(***ACTUALX=#28[44]***)]
DPRNT[(***INCY=#5[44]***)]
DPRNT[(***ACTUALY=#29[44]***)]
DPRNT[(***PCD=#18[44]***)]
DPRNT[(***ACTUALPCD=#137[44]***)]
DPRNT[(***DEVPCD=#142[34]***)]
DPRNT[(***ANG=#1[44]***)]
DPRNT[(***ACTUALANG=#139[44]***)]
DPRNT[(***DEVANG=#144[34]***)]
DPRNT[(***SIZEY=#25[44]***)]
DPRNT[(***ACTUALSIZE=#138[44]***)]
DPRNT[(***TOL=#11[24]***)]
DPRNT[(***DEVSIZE=#143[34]***)]
PCLOS
M30
%
Barcode scanner
{Available only in the full Enterprise version}
The barcode scanner may simplify a process to request a NC program from a DNC server. In this case, a machine operator does not need to send a request from a CNC machine. It can simply scan a barcode with a program name and DNC Precision adds this program to sending queue.
The scanner replaces the "Send a file" NC trigger command in the Server mode.
Requirements: The barcode scanner should have a COM port, or a USB scanner should emulate a COM port on Windows. Most USB scanners allows selecting the operation mode in the settings.
You can add a new barcode scanner using the "File - Add barcode scanner" menu item. The COM port settings are similar to connected machines.
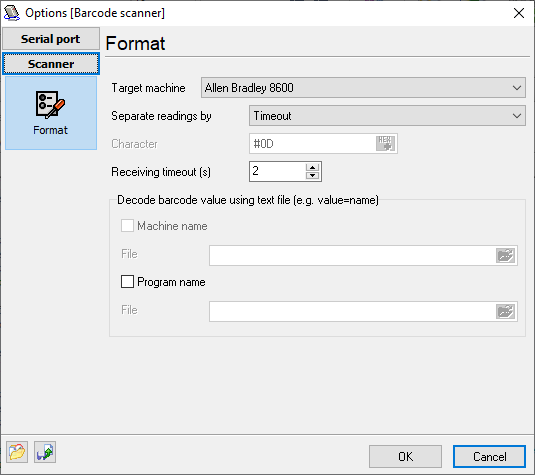
Fig. 18. Barcode scanner settings.
Target machine - if you select the "All machines" option here, one barcode scanner can handle requests for two or more closely located machines. In this case, an operator should scan two barcodes - with the target machine ID (first) and your NC program name (second). If you select a machine name in the list, the operator should only scan a barcode with a NC program name.
The barcode should contain a file name without a file extension. DNCP searches for a NC program file using the settings for the Server or Manual modes, depending on the current operating mode of a target machine.
Separate readings by - this mode allows DNCP to separate two sequential barcodes correctly:
•Timeout - DNCP waits the specified number of seconds after the last received byte before the second barcode.
•Special character - each barcode ends with a special character. Usually, it is a <LF> or <CR> ASCII characters. Usually, you can enable this character in the scanner settings. The termination character allows you to scan two codes quickly without a delay.
Decode barcode values using a text file
If the machine name or program name are too long for a barcode, you can assign unique identifiers to these names and encode to a barcode. After this, you can specify a text file where you define a mapping between an identifier and program name like:
CODE1=Long program name1
CODE2=Long program name2
...
or
MACHINE1=Vertical mill in hall 1
MACHINE2=Vertical mill in hall 2
...
If DNCP cannot find an identifier in a file, DNC Precision treats the identifier as a machine name or program name. Therefore, you can mix identifiers and real names in barcodes.
For example, if you don't want to use a barcode for a specific machine, the process would be:
1.Scan barcode for a machine ID.
2.Wait for 2 seconds.
3.Scan barcode with a program name.
4.Switch your CNC machine to the "READ" mode and receive a requested NC program.
Remote control
{You need the full Enterprise version for the server computer}
{You need the Professional license for any client computer}
Using the remote control feature, you can install and use DNC Precision in the Server mode on a headless server with limited access. Operators or users can install the DNC Precision client application on other computers or workstations, connect to the server and execute allowed operations:
•Send or receive files.
•Start or pause operations with a machine.
•Change the settings.
The remote client application has the same interface as the main application, but the server's administrator may limit some functions for an operator in the server settings (Options - Configure - Remote control, fig. 19).
You can add the unlimited number of client account with different access rights.
Login - an operator's login name.
Password - an operator's password.
Edit/Add/Delete - the remote operator can edit, add or delete machines in the list.
Start/Stop - the operator can start or stop the server mode for all machines.
Send/Receive - the operator can send or receive NC program for all machines.
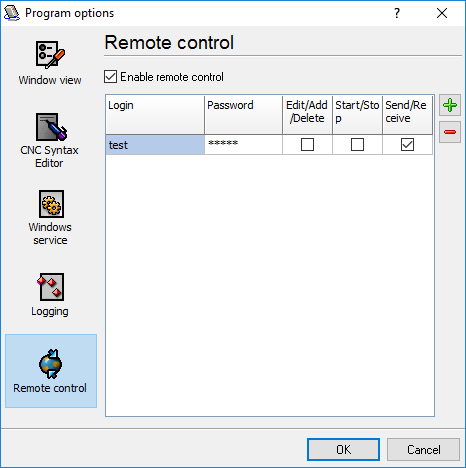
Fig. 19. Remote control settings.
To start the program in the client mode, you should install DNC Precision using the regular installation package and manually edit a shortcut on your desktop. You should append the "/client" command line parameter to the executable name.
When the client starts, it asks for a remote server's IP address, login and password and store them after the first successful connection. Next time, you may type a password only.
Windows 2000+ service
Windows 2000+ services will let you:
•automatically start service before user login.
•automatically start service with Windows.
•setup actions on emergency service restore in case of failure, for example auto service or computer restart (only on computers with Windows 2000 or later).
Note: you must be logged in as an administrator to change the configuration or control the service in any way (start, stop, pause, continue).
To enable the service mode, go to program "Main menu - Options - Configure... - Windows service" window (fig. 20), and enable the "Use program as the service" option.
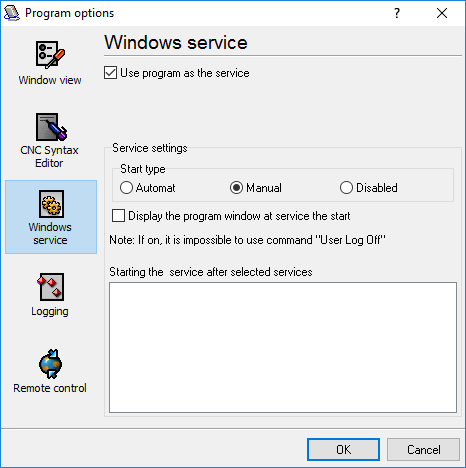
Fig. 20. Service settings.
After that, you can select the service start-up mode:
| 1. | Automatic - the service will be start automatically with Windows, before user login. |
| 2. | Manual - you should launch the service manually in the "Services" control panel. |
| 3. | Disabled - service is temporarily disabled. |
Display program window at service start - if this options is enabled, the service puts an icon to the system area (fig. 21). This feature is not available on all Windows after Windows Vista.
![]()
Fig. 21. Service icon in the system area.
If you use databases or other service applications that must start before DNC Precision, you can select them in the "Start service after selected services" list (fig. 20). After you configured the service mode, restart your computer or start the service manually in the "Services" control panel (fig. 22)
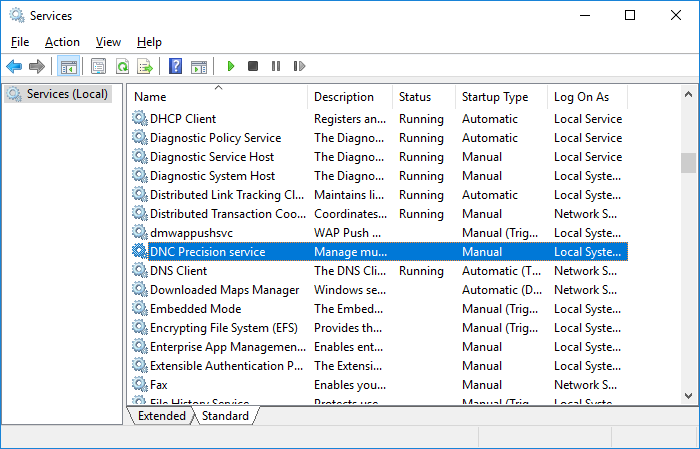
Fig. 22. Services control panel.
When the service runs in background, two processes appear in Task Manager: dncprecisesrv.exe and dncprecise.exe (fig. 23). Unlike the "srvany.exe" utility, our service safely saves all the settings when the service stops and your computer reboots.
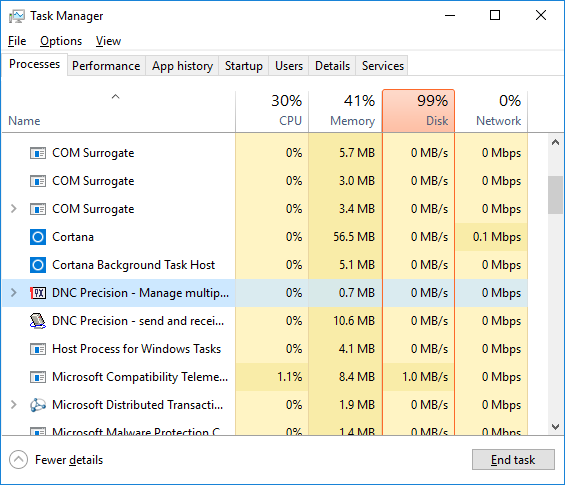
Fig. 23. Process list.
To configure the service mode, you should start the program with elevated administrator privileges (right-click on the program icon and select "Run as administrator). You can also use the following command line commands with "dncprecisesrv.exe" to control service state:
•/? - short help.
•/I - install the service with the manual start-up mode.
•/A - install the service with the automatic start-up mode.
•/D - install service with the "disabled" state.
•/R - remove the service from your computer.
Sending files from other applications
Our software has a built-in DDE server. You can use this server to transfer files from other applications.
The following Windows registry entry can help you to detect a DNC Precision location:
SOFTWARE\Microsoft\Windows\CurrentVersion\Uninstall\DNC Precision_is1,
Value: Inno Setup: App Path
The following Windows registry entry can help you to detect configured machines:
SOFTWARE\AGG Software\DNC Precision\Machines
You can search a running instance of DNC Precision by the class name
"TfrmDNCPrecise" (w/o quotes).
The following code allows you to detect, that application is started, all settings were loaded and program is initialized.
DNCP_IsStarted_Message = WM_USER+0x313;
SendMessageTimeout(windowHandle, DNCP_IsStarted_Message, 0, 0, SMTO_NORMAL, 300, msg_res);
Result: msg_res>0 - if all is ok.
DDE interface
DDE server parameters:
Service: dncprecise
Topic: DNCPDDEServer
Poke the string value "%d||SEND||%d||%s" (w/o quotes) to the DDE item "Commands", where
1.%d - DDE client identification number
2.SEND - command name
3.%d - machine index (zero based)
4.%s - file name with full path to a NC program file
If you'll wait a transfer status, then sometimes sends the following Windows message:
DNCP_GetState_Message = WM_USER+0x314;
if ( !SendMessageTimeout(windowHandle, DNCP_GetState_Message, 0, 0, SMTO_NORMAL, 300, msg_res) )
{
msg_res = 0x80000000;
}
Flag1 = msg_res & 0x80000000;
Flag2 = msg_res & 0x40000000;
tranferred_bytes = msg_res & $3FFFFFFF; // number of transferred bytes
if Flag1 isn't set, then transfer is completed/terminated.
if Flag2 is changing, then the DNCP is transferring a file.
if the transfer is completed/terminated, then you can request a status string from the "Status" item. This DDE item return a pointer to a status string:
%d||%s, where
%d - status code
%s - status message
No data received on CNC side
Problem: When trying to send data from the DNC to CNC, no data is received.
Check the port log
If no data is sent because the file is empty or does not exist, then the machine log file might give you some indication of what is wrong. For this feature, you need to enable log messages in the machine configuration. Then select a machine from the list in the main window, and now you can see log at the bottom of the window.
Check the log combo box to verify that the server is actually sending any data. If no data is sent, check the port status, in some cases the server will wait for a start of transmission signal from the CNC, if this is the case, the port status will indicate this.
Check that you are using the correct serial port
Open the configuration dialog, and check that you have selected the correct serial port.
Handshake problem
Check that you are using the correct handshake method. If hardware handshake is not enabled, try selecting Set RTS high and/or Set DTR high in the serial port configuration dialog. Some machines use non-standard software handshake characters. If this is the case change the XOn character / XOff character in the serial port configuration dialog. For further information, please refer to the Serial port section.
The CNC needs a transmission start character
Some machines need a specific character before it starts to store a file. Check the machine manual. Many machines need a % at the top of the program, some need nulls (blank tape), others need an end of block code (CR/LF). If this is the case, you should specify this in the Program start field in the configuration dialog. For further information, please refer to the Program format section.
Cycle start problem
Many machines require the program to be sent to them as soon as the cycle start button is pressed. Select transmit program at the DNC before pressing cycle start. This requires the PC to start sending when it either sees the handshake line going high (for hardware handshaking) or when it receives an XOn (for software handshaking). If software handshaking is used, then try enabling Wait for XOn before sending data in the port transmit settings. For further information, please refer to the Program format section.
Check your cable
Check that your cable is wired correctly. For information on how to wire a standard serial cable, please refer to Serial communication overview. Some machines require a special non-standard serial cable. For further information, please refer to the reference manual for your CNC.
Try another serial port
Try using another serial port, in case you have a defective serial port.
No data received on DNC server side
Problem: When trying to send data from the CNC to DNC, no data is received.
Check the port log
If no valid program name is found, then the port log might give you some indication of what is wrong. For this feature, you need to enable log messages in the machine configuration. Then select a machine from the list in the main window, and now you can see the log at the bottom of the main window.
Check that you are using the correct serial port
Check the log combo box to verify that the server is actually receiving any data. If not, open the configuration dialog, and check that you have selected the correct serial port.
Handshake problem
Check that you are using the correct handshake method. If hardware handshake is not enabled, try selecting Set RTS high and/or Set DTR high in the serial port configuration options tab. Some machines use non-standard software handshake characters. If this is the case, change the XOn character / XOff character in the serial port configuration dialog. For further information, please refer to Serial port.
Garbled data received
Problem: When trying to send data between the DNC and the CNC, the received data is garbled.
This is most likely caused by incorrect baud or data bits settings.
Check that you are using the correct baud rate
Refer to your CNC's manual for further information.
Check that you are using the correct number of data bits
Refer to your CNC's manual for further information.
Check that you are using the correct number of stop bits
Refer to your CNC's manual for further information.
Machine is using EIA code
Set machine to ASCII/ISO, or select EIA in the port configuration. Refer to your CNC's manual for further information.
Data received as one long line
Problem: When trying to send data between the DNC and the CNC, the data is received as one long line.
This is most likely caused by an incorrect value in the "Program line ending" setting.
Send data from CNC
First, enable binary log files. For further information, please refer to "Logging". Try to send data from the CNC to the DNC server, then look at a file (see this file at binary mode with any hex viewer), and see what the CNC sends as linefeed characters. When you have determined the correct line feed character(s), change the port configuration to match this. For further information, please refer to "Program format".
Machine is using EIA code
Set machine to ASCII/ISO. Refer to your CNC's manual for further information.